How to make Sushi

My oldest daughter, youngest son and I LOVE sushi. The rest of the family either hate it, or are indifferent, but the three of us have got to stick together. Sushi comes at a high price, and we usually only get it once every month or two because of that. I decided to give a try at making our own, to see how it compared to the restaurant we love.
I have to admit that I was a bit nervous. I didn’t have any tools, like the bamboo rolling mat, or the rice bazooka, so it was all done by hand! I am sure that if I had at least one of those tools, that it would have been less messy, but it was still fairly simple regardless.
We have a rice cooker, and use it a few times a week to make different rice dinners, but I have never used it for just plain white rice before. It came out perfect, not too sticky and not too loose. Our rice cooker also came with a rice spatula that we had never used before, so I figured it was time to break it out and see how to use it. It had a small indent in it to pick the rice up, then you can press it onto the nori fairly evenly.


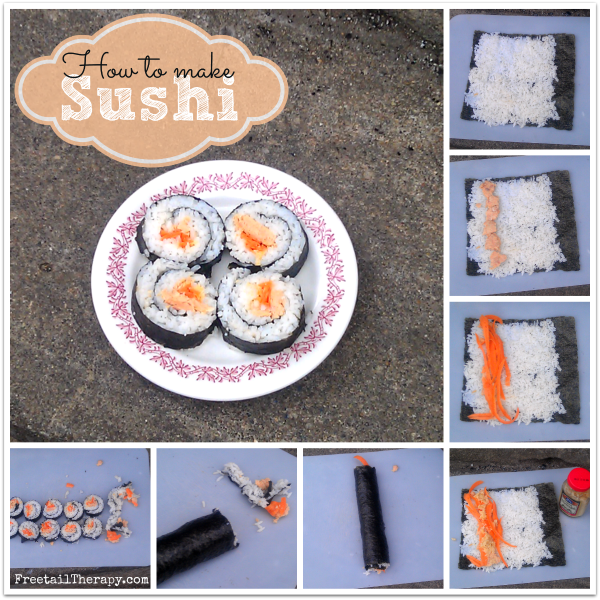
If you look at the picture at the top of this post, you will see that the little pictures around the edges are the instructions. Start at the top right and move down clockwise.
- Take a sheet of Nori (You can get this on Amazon, but it isn’t cheep. I picked mine up at my local health food store for $6.95. 1 sheet makes about 10 pieces of sushi.) and place it on a flat surface.
- Place a thin layer of rice over the entire sheet of nori, minus about an inch at one end.
- You can use whatever filling you like: tuna, shrimp, haddock, crab, cucumber, carrot, avocado….almost anything works in sushi! I used Salmon, Carrots and Horseradish. Place them in a straight line on the opposite end of the “un-rice’d” nori. You will start rolling from the filling side.
- Roll as tightly as you can, without being too tight, be careful not to rip the nori. When you reach the end without the rice, lightly wet the nori “tab” to make it stick to the roll.
- Finish rolling, then let sit for about 2 minutes to let the wet end dry firm.
- Cut into 1/4″-1/2″ slices. The ends may fall apart and not look uniform. This is because there was less pressure when rolling. A bamboo mat can help keep the pressure even, and the slices uniform.
- Place 4-8 slices on a plate, add a dish of soy sauce and wasabi and you are good to go!
It literally took me less than 10 minutes to make, and the three of us LOVED IT!